You received your new carnivorous plant in the mail and planted it (if shipped bare root). Now it’s time to sit back and enjoy, right? Not so fast. Over the next few days, your plant will go through an important adjustment period as it recovers from shipping and gets used to its new environment. During this adjustment or acclimation phase, there are several things you can do to help make the transition for your plant easier.
Humidity
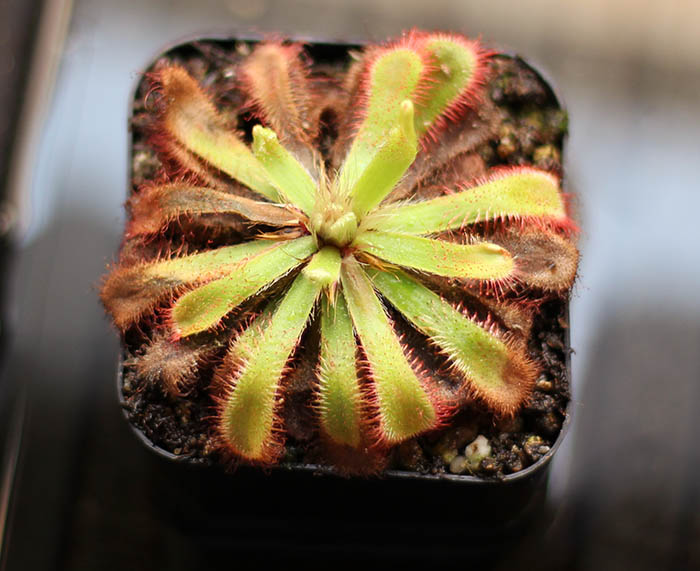
A carnivorous plant suffering from transplant shock
All of the plants that come from our nursery are used to humidity between 50-75%. However, your plant has spent several days in the mail sealed in damp wrapping which increases humidity to higher levels. If the humidity drops too quickly after arrival, the plant’s roots may not be able to replace water lost through the leaves fast enough and the plant may start to wilt, blacken, or shrink in size. This is known as transplant shock and it can be especially pronounced with bare rooted plants if not managed properly.
How do I control humidity levels?
1. To help your plant slowly adjust to lower humidity and give the roots time to reestablish, we recommend sealing the potted and watered plant in a large freezer bag. This will keep the humidity closer to the levels the plant experienced during shipping. Leave the pot in the sealed bag for 2-3 days. See note below about using this method for tropical and Mexican butterworts.
2. After 2-3 days, peal open a corner of the bag so the top is about 20% open (see image below). Cutting a corner of the bag off or poking holes in it works too. This will drop the humidity around the plant slightly but not enough that the roots will struggle to keep up with replacing lost water.
3. The following day, widen the opening in the bag by another 20%.
4. Continue increasing the size of the opening in the same manner each day until the bag is fully open. By this time, the plant should be acclimated to the humidity levels in your grow space. If you notice wilting during this process, it may be a sign you are dropping the humidity too fast. Give the plant a chance to re-hydrate and try opening the bag in smaller increments over a longer period of time.
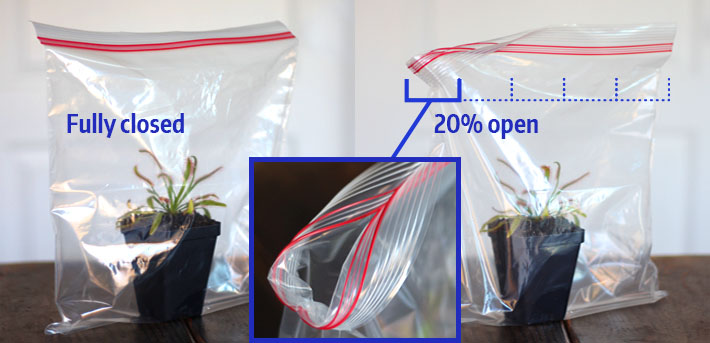
Acclimating a sundew to lower humidity using a large freezer bag
A humidity dome with adjustable vents, an empty fish tank, or clear plastic container can also be used for acclimation instead of a freezer bag as long as the there is a way to control the size of openings. If you’d like to fine tune the humidity even further, you can invest in a small hygrometer like this one.
Note: When acclimating tropical and Mexican butterworts, we recommend starting with the bag half open at the beginning rather than fully closed. Butterworts don’t require as much humidity initially compared to other types of carnivorous plants. In fact, too much humidity could put them at unnecessary risk of crown rot.
What about airflow during the acclimation phase?

Tip: It’s best to start with new media when acclimating bare root plants, preferably a mix that contains well rinsed and/or sterilized ingredients like ours. Good airflow becomes much more important at the very beginning if you are reusing soil. Used soil has a much higher spore and bacteria count and can overwhelm a new plant more easily than using fresh soil.
Can I mist my plant to keep the humidity high?
For butterworts, sundews, and other dew-producing plants, we do not recommend misting. Misting can cause unnecessary stress by washing away the dew the plants work hard to produce. This means they will have to expend extra energy replacing it. For other types of carnivorous plants like Nepenthes and Heliamphora pitcher plants, misting can be beneficial. A humidifier or fog machine running on timed intervals works well, however sporadic or manual misting will only raise the humidity temporarily and it will be difficult to maintain consistent levels around the plant.
Temperature

Acclimating plants to humidity levels using a plastic bag or dome can sometimes present a challenge with heat build up. The temperature in a sealed bag left in the sun, even indoors on a windowsill, can skyrocket to 100+ °F in no time due to the greenhouse effect. The hygrometer we mentioned earlier also doubles as a thermometer and can help monitor temperatures. Offsetting humidity and light acclimation (explained below) is a good way to help minimize heat build up as well.
Tip: Soil mass can have a significant affect on temperature (and moisture) stability and is worth considering when growing carnivorous plants, especially if they will be outdoors. Plant roots in a large pot of soil or planted directly in the ground will heat up and cool down slower than those in a small pot. Gradual temperature shifts will lead to happier plants.
Light
At this time, we grow most of the plants in our nursery using either artificial light or filtered sunlight. This means they aren’t used to high levels of UV radiation from direct sun. If you plan to grow your plant outdoors, it will be important to adjust it slowly to this more intense form of light. Sometimes you can do this at the same time as humidity acclimation with extra care that the plant doesn’t overheat. For the safest route though, adjust the light levels after humidity acclimation to keep temperatures lower.
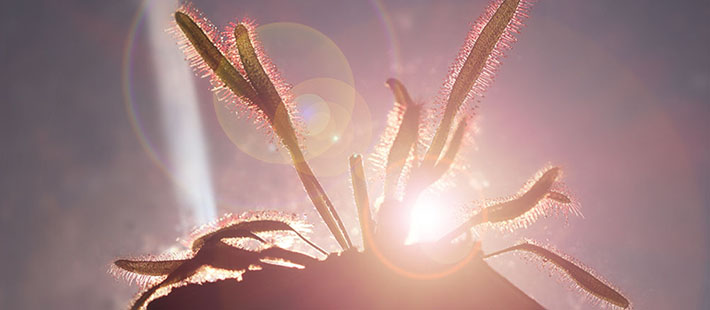
How do I control light levels?
The process for acclimating your plant to stronger light is similar to humidity acclimation. The idea is to expose the plant to the preferred light conditions in increasing amounts over several days:
1. For the first 2-3 days after delivery and potting, the plant should stay out of direct sun. Setting the pot on a window sill that receives indirect light or a shaded spot outdoors is best. An artificial light that won’t get too hot like a compact fluorescent bulb or white LED also works.
2. After 2-3 days, place the plant in direct sun for 1-2 hours only. Ideally, start in the morning since the sun will be less intense.
3. The following day, leave the plant in the sun for 2-3 hours.
4. Continue increasing the amount of exposure time by 1-2 hour increments each day until the plant remains in full sun through the afternoon. If you notice leaf burn or wilting, this can be a sign acclimation may be moving too quickly and you need to slow things down.
What if I only want to use artificial lighting?
Go for it! The steps above still apply, but you won’t need to follow them as strictly since UV radiation is less of a concern. Humidity acclimation and temperature monitoring will still be important though.
What kind of light is best for my plant and how much does it need?
These are big questions and we’re glad you asked! We have a whole series on light for carnivorous plants to help answer them:
- Part 1 – What type of light do carnivorous plants need?
- Part 2 – How much light do carnivorous plants need?
- Part 3 – Which grow lights are best?


Hi, I’d like to ask a question for the Drosera graomogolensis and the Drosera fulva, you see I want to know what would be best for them in the matter of area of growth, say like in side with a green house dome or on a windowsill, because I want to be able to adjust them to my area, but what worries me is if it’s even suitable for over here, but once again if with dome wouldn’t it be more care?, also saying if am going to move or something like that, wouldn’t it be difficult with a dome than if they could be acclimated. I live in Torrance California so I thought asking you guys would be the best choice. Thanks, hopefully am overthinking it.
Hi Bani, for D. graomogolensis and D. fulva, typically indoors is best. A window that receives plenty of direct sun or under a grow light is ideal. We recommend keeping them in higher humidity initially as outlined in the instructions here to help with acclimation and then keeping them in moderate humidity after that. For more detailed growing info, you can also see the “Growing Requirements” section for each plant on the site too. This gives more specifics about watering, feeding, and any dormancy needs as well.
If moving, you would want to compare the conditions between what they are used to and what they would be arriving into. If they are significantly different, then some acclimation time could be beneficial in that instance as well. Hopefully this helps!
Hello!!
I bought a regia from you in the summer and it did well, however in November it froze accidentally and died back. It still hasn’t come back yet but it isn’t dead, the roots are still firm and it’s still in the same spot as if it still had leaves. Ang idea when it would begin to grow leaves again? It’s been in my greenhouse inside with grow lights for some time now but nothing yet. My capensis have come back but it hasn’t yet
Hi Christian, sorry to hear the D. regia froze but glad the roots made it ok! The cold weather has probably induced dormancy in the plant so it may take until spring for it to start waking back up again once the temperatures begin to warm and day length increases. You could always try bringing it indoors and coax it awake sooner, butyou may find it will come back more robust if it has rested awhile. Thanks so much!
How long after the plants have fully acclimated do the leaves get “sticky” again? My plants are doing great, been a couple weeks and we have some new leaves growing. Just wondering if I should be looking at feeding them since they may or may not be sticky?
Thanks so much for your order! For butterworts it usually takes around 1-2 weeks for plants in their carnivorous phase to get their dew back when transitioning into their recommended growing conditions. If the leaves feel sticky to the touch, they are ready for a meal!
Question! When it says “cause roots to blacken”, I’m assuming that is a bad thing. What if we received the plant and it already had black roots upon unwrapping from the damp towel?
Hi Ashleigh, thanks for your question! It looks like you are referring to the line “If the humidity drops too quickly after arrival, the plant’s roots may not be able to replace water lost through the leaves fast enough and the plant may start to wilt, blacken, or shrink in size.”. The blackening mentioned is regarding the leaf color changing rather than the roots themselves. The healthy roots of many sundews species are naturally black so that would not be a cause for concern. If you are noticing severe browning or blackening on the leaves though this would be an indication of stress and something to watch for! Hopefully this helps clarify :)
Thank you again!
The Curious Plant Team
Ok Wish I knew exactly how to plant the Heliamphora Nutans. Just got it and it’s a beautiful large one, w three pitchers and one in the works. I’m not going to unpack it yet cuz I’m too nervous. Hope to hear from Curious soon so I can do what I need to do.
Thank you for your order Thomas! You emailed with some questions as well and we just replied so please check your inbox!
I received a D. regia in the mail the other day. I snipped some roots for cuttings. How long will it take for it recover from shock. As it was shipped bare rooted.
Hi Jesse, I was not able to find an order from you in our system and we haven’t shipped any bare root D. regia recently so I am assuming you received this plant from another grower. Assuming the plant has thicker roots (more mature specimen) and is actively growing, it should settle in within 2-3 weeks using our acclimation procedure. If it arrived stressed it ma take longer though.
I didn’t order anything I just had a question.
Ok gotcha, yes I always check because sometimes it can help with context to give better advice. I also forgot to mention if the plant is smaller with thinner roots, it may take a little longer to acclimate as well since the plants are more delicate during that time.
I’m looking to purchase a pinguicula but looking up as much research before purchasing. I was wondering if the plant needed to be repotted once i receive it. If so should it be done before or after acclimation?
Thank youuuu
Hi Irene! Yes, all of our Pinguicula ship bare root for the safety of the plant in transit and need to be potted on arrival. Pre-packaged soil mix can be added to the order when selecting the plant and we have a video in our care guides here on how to pot them: https://curiousplant.com/butterwort-care/. Hopefully this offers some useful tips for you but if you have any questions feel free to reach out, we’re happy to help! Thanks so much :)
So I didn’t find this article until it was too late!!! I just got 3 plants in the mail Venus fly trap, bill belly and Neptune pitcher plants I put them directly in the terrarium! I got them 7 days ago and most of the pitchers on the Neptune where either completely shriveled up or already brown when I got it but there was two really healthy lookin ones but the bill belly had all the pitchers brown two was shriveled so I left them on thinking they might perk back up! Now the 2 Neptunes hav closed their lids. The green itself looks good r my plants savable or did I really mess up?
Hi Holly, I’m glad you found our article. It sounds like the leaves on the plant are still alive so the plants should be ok. New leaves will produce more traps if the growing conditions are good but if they continue to dry out, increasing the humidity would be a good idea!
Hi!
Just received my plants yesterday and they’re amazing! My drosera Regia does have one black leaf and a few tips of the leaves are black. Will they recover during acclimation or should I snip them off?
Thanks!
Hi Megan, glad to hear you are enjoying the plants!! It is fairly normal for a couple of the tips and outer leaves on Drosera regia to turn black after shipping and as the plant acclimates. It’s ok to snip off these sections to keep mold from growing on them. D. regia are fast growers so it will replace any lost leaves quickly. Thanks so much and feel free to reach out if you have any questions!